Uncategorized

Google Search Ads for Local Business Marketing: Unlock Your Local Growth Potential

In the digital age, local businesses face unprecedented challenges and opportunities in reaching their target audience. Google Search Ads have emerged as a powerful weapon in a local business’s marketing arsenal, offering precision targeting and measurable results that can transform your local marketing strategy. Let’s learn about how we can take help of Google Search Ads for local business marketing. Understanding the Power of Google Search Ads for Local Businesses Local businesses often struggle to compete with larger competitors in the digital marketplace. Google Search Ads level the playing field, providing an affordable and effective way to reach potential customers exactly when they’re searching for your products or services. Why you Need Google Search Ads for Local Business Marketing? Traditional marketing methods are becoming increasingly obsolete. Customers today rely heavily on online searches to find local services, making Google Search Ads an critical component of any local marketing strategy. Whether you’re a neighborhood coffee shop, a local plumber, or a community healthcare provider, search ads can help you: Key Strategies for Google Search Ads for Local Business Marketing 1. Hyper-Local Keyword Targeting The secret to successful local search ads lies in understanding and implementing hyper-local keyword strategies. This means going beyond generic keywords and focusing on location-specific search terms that potential customers use. Examples of Local Search Keywords: 2. Leverage Location Extensions Location extensions are a game-changer for local businesses. They allow you to: Crafting Compelling Ad Copy for Local Audiences Your ad copy is the first interaction potential customers have with your business. Creating localized, engaging ad copy is crucial for driving clicks and conversions. Best Practices for Local Ad Copywriting: Example Ad Copy Structure: Budget Optimization for Local Search Ads Local businesses often operate with limited marketing budgets. Google Search Ads offer flexible budgeting options that can help you maximize your return on investment. Budget Allocation Strategies: Advanced Targeting Techniques Geo-Targeting Precision Audience Targeting Refinement Tracking and Measuring Local Ad Performance Performance tracking is critical for local businesses. Google provides robust tools to measure the effectiveness of your search ads: Key Performance Indicators (KPIs) to Track: Common mistakes to avoid in Google Search Ads for Local Marketing: Practical Implementation Roadmap Step-by-Step Setting up Google Search Ads for Local Business Marketing: 1. Conduct local keyword research Conduct Keyword Research using Google keyword Planner to get an idea about the best keywords for your business. This will help you in appearing on the right searches by your audience at the time of their need. If you are not sure how to do keyword research, read how to choose the right keywords for your Google Search Ads. 2. Create a Google Ads account If you are just starting, and don’t have a Google ads account, please search for Google ads on Google or Go to Google Ads directly. Create your Free Account using your Gmail id. Watch the video below to get the complete steps how to create Google Ads account: 3. Select Objective and Campaign Type The Next after you create your Google Ads Account is to Create a New campaign, select the objective as Local Store Visits and Promotion. You can also choose the objective as Leads or Website Traffic and then choose the campaign Type as Search Ads, if you want to appear on Google Searches only. Local Store visits will run a Performance Max Campaign, which makes your ad appears on all the Google Properties including Search, Display, YouTube, Gmail, Apps, Maps, etc. 4. Design compelling ad copy The Next step is to Design the relevant ad copy with clearly mentioning the services you are offering with a clear call to action. 5. Set an initial budget Set your Initial budget as per your comfort to get ads live on the Google searches. Install conversion tracking To track the effectiveness and results in Google Ads dashboard, set up the conversion tracking on your website. This will help Google Ads in collecting data from your website, whenever someone converts on your website. It will further help in optimizing your campaigns. 6. Monitor and optimize regularly Regularly monitor the campaign performance and adjust accordingly to optimize the campaign. Conclusion: Google Search Ads for Local Business Marketing Transformation Google Search Ads represent more than just an advertising channel – they’re a strategic tool for local business growth. By implementing these strategies, you can connect with local customers, drive meaningful traffic, and ultimately grow your business in the digital marketplace. Final Tips for Success: Ready to take your local business marketing to the next level? Start your Google Search Ads journey today and unlock unprecedented growth potential! Frequently Asked Questions (FAQs): Google Search Ads for Local Business Marketing

Google Search Ads for Local Business Marketing: Unlock Your Local Growth Potential Read More »

Best WordPress Course Online in Noida: The Ultimate Guide to Master WordPress.

Are you looking for the best WordPress course online in Noida? Whether you’re a complete beginner looking to build your first website, or an experienced user wanting to take your skills to the next level, choosing the right WordPress course can make all the difference. In this detailed guide, we will explore why WordPress is the best platform for building websites, what to look for in a WordPress course, and how our Advanced WordPress Course (Beginner to Advanced Level) can help you master WordPress and become an expert in just a few weeks. Why Choose the best WordPress course online in Noida? WordPress powers over 40% of websites on the internet today, and it’s the most popular Content Management System (CMS) globally. It’s no surprise that WordPress is the platform of choice for businesses, bloggers, and eCommerce websites alike. The ease of use, scalability, and an enormous library of themes and plugins make it the go-to platform for creating professional, functional websites with minimal coding knowledge. But with its vast features and capabilities, learning WordPress can seem overwhelming if you don’t have the right guidance. That’s where the best WordPress course online in Noida comes in. What Makes a Great WordPress Course? Before we dive into the details of our Advanced WordPress Course, let’s take a look at what you should look for in a quality WordPress course. A good course should: Now that we know what to look for, let’s take a deeper dive into why our Advanced WordPress Course (Beginner to Advanced Level) is the perfect choice for anyone looking for the best WordPress course online in Noida. Why Choose Our WordPress Course? 1. Comprehensive Curriculum for All Levels Our Advanced WordPress Course is designed to cater to beginners and advanced users alike. Whether you’re starting from scratch or looking to enhance your skills, this course covers it all. Here’s a sneak peek of what you’ll learn: 2. Learn from Industry Experts Our course is designed and taught by industry professional who have years of experience in WordPress development, SEO, and website design. You’ll be learning from the best in the business, and you’ll have the opportunity to ask questions, clarify doubts, and gain practical insights from experts. 3. Affordable Pricing – Just ₹199 We understand the importance of affordable education, especially if you’re just starting your journey into web development and digital marketing. That’s why we offer the Advanced WordPress Course for just Rs 199—an unbeatable price for a comprehensive, high-quality course. This affordable price allows anyone in Noida or anywhere else in the world to access premium WordPress training without breaking the bank. Whether you’re a student, a freelancer, or a small business owner, this course is designed to be budget-friendly without compromising on quality. 4. Hands-On Learning One of the best ways to learn WordPress is through hands-on practice. Our course gives you the opportunity to work on live projects and real-world scenarios. You’ll be building websites, customizing themes, and troubleshooting problems as you go. This practical approach ensures that you are not just watching videos, but actively learning and applying the skills you acquire. 5. Access to a Supportive Community When you enroll in our course, you gain access to a vibrant community of learners. This community will help you stay motivated and engaged throughout the course. Plus, you can share your progress, ask for feedback, and get answers to your questions from fellow learners and instructors. Additionally, our dedicated support team is always available to help you with any issues or doubts you may have, ensuring that you never feel stuck during the learning process. 6. Lifetime Access Once you enroll in the course, you get lifetime access to all the materials, including updates. This means that as WordPress evolves, you can return to the course at any time to stay updated with the latest features and best practices. Who Should Enroll in This Best WordPress Course Online in Noida? Our Advanced WordPress Course is perfect for: How to Enroll in the Best WordPress Course Online in Noida? Ready to take the plunge and start your WordPress journey? Enrolling in our Advanced WordPress Course (Beginner to Advanced Level) is easy. Here’s how you can get started: Conclusion In today’s digital world, knowing how to build and manage a WordPress website is a valuable skill that can open doors to a wide range of opportunities. Whether you’re looking to start your own business, build a personal blog, or offer WordPress services as a freelancer, mastering WordPress is essential. By enrolling in our Advanced WordPress Course (Beginner to Advanced Level), you’ll get the best training available at an unbeatable price of Rs199. With comprehensive lessons, practical exercises, expert instructors, and a supportive community, this course is the best WordPress course online in Noida. Don’t miss out on this opportunity to master WordPress and boost your career. Enroll now and start building your WordPress website today!

Best WordPress Course Online in Noida: The Ultimate Guide to Master WordPress. Read More »

How to Install WordPress on Localhost in 5 Easy Steps.

In this tutorial, I will explain how to install WordPress on localhost in 5 easy steps. WordPress comprises 60% of websites on the internet. Learning WordPress is easy and fun. WordPress is a CMS (Content Management System) which allows you to create a website also. Today, WordPress is being used by top organizations, celebrities, government organizations, etc. For example, our prime minister’s website is made up of WordPress. Similarly, IBPS, Facebook Newsroom, Microsoft Newsroom, etc are some of the known names whose websites are on WordPress. So, . 5 Steps on how to Install WordPress on Localhost The 5 steps that we will be going to discuss in this post are: Downloading the latest version of WordPress. Download XAMPP (Software for creating localhost on your system) Install and Run XAMPP. Creating a Database. Installing the WordPress on Localhost. What is Localhost and why to install WordPress on local host? Let’s understand this from the basics. To create a website, you need two things, i.e. Domain and Hosting. Hosting is the space in the virtual world (Internet) where your website is present or hosted. This space is usually presented on servers. It means to host a website, we need some space on the server. Now, to reach this website on Internet, we need an address. The domain is the address that takes users from any part of the world to the server where our website is hosted. When your website is hosted on the server, it is visible to every user who searches for it. If you want to learn the basics and test the output before going live on the internet, localhost is the best option. Localhost makes your system the server that hosts your website. Once you are done with the website testing process and satisfied with the final outcome, you make your site live. How to Install WordPress on Localhost? Installing WordPress is very easy in both the case, i.e. Cpanel and localhost. If you are planning to install WordPress through Cpanel, please read the domain and hosting: Easy steps to purchase, after which you can install WordPress from Cpanel. In this post, I will explain how to install WordPress on localhost. There is various software in the market that helps you to install WordPress on localhost. In this tutorial, I will be using XAMPP for installing WordPress on localhost. To run a WordPress site, we need three things: Server, programming language, and database. XAMPP creates these three things on your PC using web server software APACHE, PHP, and MSQL. Apache is a web server application. PHP is the programming language, and MSQL is a database management solution. PHP and MYSQL is required to run a wordpress website. Step 1: Download the Version of WordPress To download the latest version of wordpress: Go to the Official Website of WordPress, and click on the “Get WordPress” Button. Click on the download wordpress button. The zip file will be downloaded in a few minutes. Now, let’s move to the next step. Step 2: Downlaod XAMPP Go to the official XAMPP’s Website. Choose your operating system and download the software. XAMPP has different versions for different operating systems. Choose the one which is applicable to you. Click on the download button and wait for some time to download the software. Step 3: Install and Run XAMPP After downloading the XAMPP, unzip it. When the file is ready, proceed with the installation process. Click on the install button. and follow the steps. Now a dialog box will open, which shows some checkboxes that are already checked. You can check the checkboxes that your require and then click on next. (If you are not sure which checkbox to check or uncheck, keep Apache, MYSQL in Server, PHP, and phpMyAdmin in Program Language checkboxes checked.) After that, choose the installing drive where you want to install the software. Please name the folder with xampp so that you can identify the folder in the drive. After selecting the drive, click on the NEXT button. The installation process will be started. You will see a security alert if you have any antivirus installed on your system. Don’t worry about it, check any of the options and click on Allow Access. Now you are at the end of the installation process. Click on Finish to complete the installation. Congratulations! XAMPP has been installed successfully on your system. Step 4: Creating a Database To create a database, first, we need to create a folder where all the data of the website will be stored: Go to the drive where you have saved the xampp folder. Select the “htdocs folder” and paste the wordpress folder which we have downloaded in first step. (Unzip the wordpress folder here after pasting.) After unzipping the wordpress folder in htdocs, rename the unzipped wordpress folder with the name of the site that you want to create. For this tutorial, I have renamed the folder with “demowebsite”. Now open a new tab on your browser and search for localhost/phpmyadmin Now select the database option on the top menu option. Write the same name for database that we had entered for the wordpress folder in htdocs. It means we are creating database for the same website, so the database needs to be same as of the website. Click on create button, your database will be created within seconds. Congratulations! You have successfully created database for your website. Now is the final step to install wordpress on the localhost. Note: Before installing the wordpress on localhost, we need to start Apache server and MySQL database from the XAMPP control panel. Without starting it, we will not be able to access phpmyadmin. To start both options, go the folder where XAMPP is installed. Select the XAMPP control panel, and start Apache and MySQL. Step 5: Installing the WordPress on Localhost Open a new tab on the browser and type localhost/websitename (“demowebsite” in my case) Press enter button and wordpress set up installation window is opened. Select

How to Install WordPress on Localhost in 5 Easy Steps. Read More »

Domain and hosting: Easy Steps to Purchase.

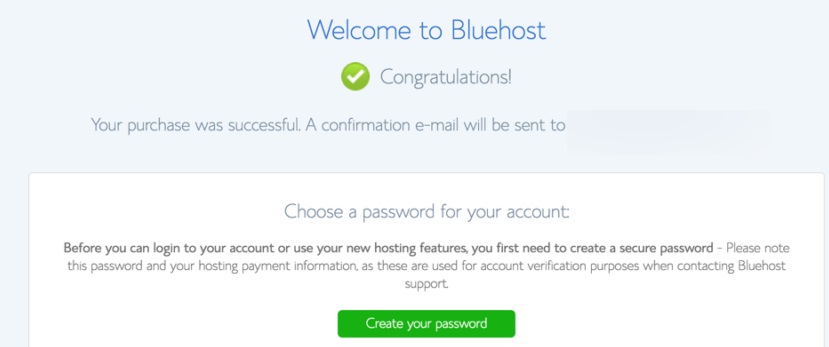
Want to start your own website, but worried about how to purchase domain and hosting? Continue reading, this blog will help you understand the complete website creation process along with the purchase. I generally prefer Bluehost hosting as per the service and reviews and experience. So in this tutorial, I will be explaining to you how to purchase a domain and hosting from Bluehost. The process will remain the same for other platforms too. So, let’s get started. First Question is why I am choosing Bluehost? Because I am using bluehost and its services for a long time, I did not get any complaint from them. Plus, the bluehost is a user friendly platform, if you are creating your website for the first time, this platform will do it all. It will guide you at every step and finally take you to the website dashboard. Also, bluehost provides free domain with hosting package, it will help you save additional money on domain purchasing separately. Bluehost offers Free SSL certificate, provides security to your website (also preferred by search engines). And, there are many reasons for using bluehost. Before we begin, there are something that you should be ready for how to purchase domain and hosting for the first time. Domain Name: Domain name is the name of your website. You have the option to choose a unique name for your website. If you haven’t decided on the domain name yet, you can use BustAname and Namestation tool for domain ideas. Payment Method: You can make payment via credit card, debit card, Internet banking, UPI, or PayPal while purchasing domain and hosting. Be patient, these steps are bit detailed, so it’s my request to please hold on, stick on it, and enjoy the process of your first website creation process. Who knows, you might be creating website for others or teaching the same to someone after some time. Disclaimer: This article contains an affiliate link. If you purchase through one of the links, I will receive a small commission, at no additional cost to you. Lets get started finally: The step-by-step guide to Purchase a Domain and hosting from Bluehost: First Login to Bluehost.  Click on Get Started. This will take you to a page where you will see three different packages from which to choose. Now Choose one of the three package as per following recommendation: If you have a Plan to run single website: Choose “Basic” Planning to set up more than one websites: Choose “Plus” More than one website plus secure your information via who.is guard: Choose “Choice Plus”/ “Pro” In basic plan, you can create a single website only. It means, on you will be getting a space of creating or hosting a single website on bluehost server. Now, if you have a plan to create more websites in future, I suggest you to purchase plus or choice plus package, which offers you the space to host multiple websites. After choosing your plan Enter the domain name you want to make your website on, to search for its availability. If you already have a domain, then enter your domain in the second box. After selecting your domain, Bluehost will ask you to enter your personal details. Let’s understand, why you need to enter your personal details here. When you purchase a domain, Bluehost will register this domain in your name. After the domain registered in your name, it will not be sold to another person from another platform. Now, Create your Account by entering your details. After entering your details, there will be an option of package information, where you need to select the package for your hosting duration. If you are just starting up, and want to check whether you will continue for long or not, I suggest you please go for a single year. If you are purchasing for the long term, I will suggest you to choose for more than one year. The benefit in this will be is that it will be comparatively cheaper from one year, if you purchase it for 2 or 3 years. Choose Your Package as per your Need. Be sure to uncheck all the boxes. If you need any of the options, you can remain them as checked. But to be honest, you don’t need them as of now, so please uncheck all for the time being. Complete your purchase. After payment, if the sales page pops up offering service, click on No thanks. Click on Create password and enter your password. Save this password in a safer place. Check your email, you will get an email with your login details. Click on the link to login to Cpanel. Save the information shown after clicking this link. Go to the Bluehost login page and click on login. Enter your domain name or username and password and click on submit button. The new screen will open the Bluehost welcome window. Now follow the steps and answer the questions that Bluehost asks about your website. It will ask about your title, website name, a theme that you want to install on your website. Just click next and finally finish. Bluehost will take you to the final dashboard which looks like this. Congratulations, you have successfully purchase domain and hosting for your first website. Also, if you want to read about what is Google Ads and what are the ways Google ads can be helpful for your business, refer to What is Google Ads?

Domain and hosting: Easy Steps to Purchase. Read More »

What are Google Ads?

What are Google Ads?Google Ads is an advertising platform by Google, to reach potential customers in less time with customized ads. You can advertise your products on various networks like search, display, video, and app networks. Google As is a widely used paid marketing platform that assures you to give quick results for your campaigns. It gives you the flexibility to place your ads at your desired platform and on the desired network. In fact, you can even target in as detail as by targeting a specific youtube channel or website, or app. Why Google Ads is beneficial for your business?Is Google Ads for Me Too?Google Adwords, as explained earlier, gives you wide flexibility to choose your placement channel or network. Hence, if you are constrained by your budget, still you can target placement where you think your potential audience is. Know how Google Adwords works in a unique way to place the ads as per eligibility. Quick Results through Google Adwords.Quick results can be expected with google AdwordsThe best thing about Google Adwords is you can create your promotion/advertisement in a day. Apart from creating advertisements, you can also expect desired results with properly executed campaigns. A/B TestingYou can create any number of ads for your product/service and test them which are performing better. With higher results and more clicks, you can decide clearly which ad will give you better results. Choose and Pay for your Business keywords only.Google Adwords allows you to choose your business keywords (keywords on which your ads Pop up if someone search). So, you will be paying for those keywords only for which your ad is getting clicks. So, it becomes a highly targeted campaign to reach out the potential customers who are actively searching for your business/service. Pay only for ResultsYou know what, Google will charge you only for results. If you are not getting results, Google will not charge you anything. So, you can place your ad on the search network, display network, app network, etc, and will be charged only when someone clicks on it. Pay for Result in PPCSimilarly, if you are selling products online, you will be paying only when you get a sale. It means you will be charged by Google, once someone purchases your product only. Choose Your BudgetBudget can be choosen in Google AdwordsThe best thing about Google Adwords is that you are free to choose your budget. There is no compulsion from Google to choose the budget according to it. You can start running your campaign in as little as 100 rs. Similarly, there are various bidding strategies that help you to optimize your budget and give you the best result in your budget. Tracking AudienceYou can track each and every penny spent on your campaign on the Google AdWords dashboard. Here you will get some details like the average CPC you are getting, no clicks, no of impressions, conversions, etc. Retarget your Audience through Google AdwordsRetargeting helps in increasing conversion rates by showing our rate to the same audience who interacted with our ads before. The cost of retargeting is also very less compared to the ad when it targets fresh users. Google Adwords, allows to track and retarget the audience again and again even after two months of business interaction. You can retarget for a maximum of 540 days to the audience who interacted with your ad. To Retarget you need to place the retargeting code on your website. After that Google will start tracking the audience for every paid advertisement. The audience created in retargeting can be targeted on other platforms too. For example, if you are creating an audience from the search network, you can also target this audience on display networks. That is the double benefit of retargeting. Cost CappingGoogle Adwords gives you the option to place caps on the cost you do not want to cross. It means if you are advertising with a tight budget and you are very clear for every single click and conversion, you can go with cost capping. If the competition is high, and you are worried about the extra cost, you can put cost capping on your budget. Scheduling of Ads:You can choose the time when your ad runs and when not runs. Suppose you are running ads from the past 3 days and in Ad schedule options and accordingly pause your ad in hours when you did not receive any clicks. Similarly, you can increase the budget of your campaign at peak times so that you get maximum results. Device Targeting:Yes, you can choose the device where you want your ads run, whether it is mobile, laptop, or tablet. You can even target in a deeper manner by selecting the version of the mobile software and Carrier network. Suppose your ads received maximum conversions from android smartphones and not from desktop, tables, and iPhones. So, you can increase your ad’s budget for android phones only, so that other device users can’t see your ads. Location Targeting:With Google Adwords, you can target locations on the basis of Country, State, Region, City, as well as Pin Codes. It means within an area, if you want to target a specific audience, you can do with location targeting. For Example, You are selling a premium product and your targeted audience is living in a specific area. Instead of choosing the complete region, that particular can be choosen easily. This helps you in saving costs in showing your ads to other uninterested audiences. Planning:Google Adwords gives you the tool with the name “Search Volume and Forecast”, under the keyword planner. It helps you to get a rough idea about your search terms and clicks they are eligible to get. This means you can plan your strategy and can expect to get results as per the forecast. It is very helpful for generating proposals for clients as well as for the beginner. These were some of the benefits of using Google Adwords. Hope now it is clear

What are Google Ads? Read More »